
To make necessary changes to your WD router’s settings, it is important to log in to the settings dashboard of your WD router. WD router is the short form of Western Digital router. The Western Digital router provides its users with fast speed and secure connections. The Western Digital router is a Central HD Dual-Band router that comes up with super storage of 2TB HDD built-in. This dual-band router has the capability to speed up your internet up to 450 MBPS.
To get benefited from your router properly, it is important to log in to the settings dashboard of your router. In this article, we will discuss how you can login to the settings dashboard of your Western Digital router. Also, you will learn the setup process for Western Digital router.
How to login to a Western Digital Router?

The web interface for Western Digital router is the control panel where all the necessary settings for your router are stored. All you need is:
- A website browser
- A western digital router
- Access to the WiFi network of your Western Digital router.
Check all the above-mentioned requirements and then follow the step by step login guide mentioned below:
- Step – 1: First of all connect your device with your Western Digital router. You can perform this task by using an Ethernet cable or a wireless connection. During the login process, it is recommended to use a wired connection in order to avoid network problems. A wired connection can be made by using an Ethernet cable.
- Step – 2: Now, after establishing a connection, start your device and open your web browser (such as Google Chrome, Mozilla Firefox, Safari, and Internet Explorer etc).
- Step – 3: In the address bar enter the default IP address for your Western Digital router. The default IP address for Western Digital router is 192.168.1.1. After typing the default IP address hit the enter key and proceed.
- Step – 4: Within a few minutes you will be redirected to the login page for your Western Digital router. Here you will be asked to enter the default username and password for your Western Digital router. If you are unfamiliar with the default login details of your router then you can use the following username and password:
Default Username: admin
Default Password: password
The information mentioned above is case sensitive. Make sure to enter it correctly.
- Step – 5: After entering the default username and password click on the sign-in button. Wait for a few seconds and you will be redirected to the settings dashboard of your Western Digital router, where you can change and modify your router’s network and settings.
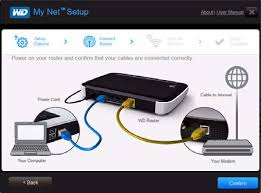
Western Digital Router Setup
Setting up a Western Digital router is not an easy task. There are chances that you might face different sorts of issues during the setup process. In this section, you will get a detailed and step by step guide regarding your Western Digital router setup.
Whenever you buy a new router, the company officially sends its agent with you so that he can perform the setup process for your newly bought router. In most cases, this happens. But if at your end the situation is different then there is no need to get worried. You can easily set up your Western Digital router by yourself.
All you need to do is to follow the guide mentioned below:
- Place your modem and Western Digital router at a safe spot in your house. It is recommended to locate them in the bottom so that you can get good network coverage across your house.
- Connect your modem to the power cord and then insert the power cord into the wall outlet.
- Establish a connection between your modem and router by using an Ethernet cable. Plugin one end of the cable into your modem and the other end into your Western Digital router.
- Check if the LED lights of your modem started blinking or not.
- Now, connect your device with your Western Digital router. Again use an Ethernet cable for this task.
- Check your equipment once, and then turn on your device.
- You will get a Setup CD with your Western Digital router, insert the CD into your device CD/DVD Drive.
- Wait for a few seconds, a dialog box will appear on your screen. Here you will see an option named as Run EasySetup.exe. Click on it.
- Now double click on the CD and then again double click on the EasySetup.exe so that the setup screen displays on your device interface.
- In the next step, follow the on-screen instructions and set up your Western Digital router.
This is how you can set up your Western Digital router just by following a few simple steps.
How to change the default password for Western Digital router?

In order to make your router more safe and sound, it is recommended to change the default password for it. Changing the default password for your Western Digital router will help you to make your router more protected against the attack of invaders. In this way, no one will be able to get access to your Western Digital router’s network except you.
Follow the steps below to change the default password for Western Digital router:
- Step – 1: Start your device and open your web browser. Enter the default IP address for Western Digital router in the address bar and proceed.
- Step – 2: In the login page enter the default login credentials for your Western Digital router.
- Step – 3: After getting access to the settings dashboard, search for the settings option and click on it.
- Step – 4: In the settings tab, search for the Advanced Settings option and click on it.
- Step – 5: After a few seconds, you will be redirected to the Advanced Settings tab. Here you can change necessary settings regarding your router such as changing the default username and password, enabling and disabling of firewall etc. Click on the change password button.
- Step – 6: In the next page, type your old password in the required field. After that in the next blank enter your new password.
- Step – 7:Confirm your new password by typing it again.
- Step – 8: Click on the Apply button to save the settings you have just made.
This is how you can change the default password for your Western Digital router.
Western Digital Router Reset

In case if you have forgotten the default login details for your Western Digital router then you can reset your router anytime in order to revert them back to the defaults.
Other Routers:
- Best Wireless Routers [Top 3 in Each Category] 2020
- Router Limits [Login, Setup, Reset, Defaults]
- Mikrotik Router [Login, Setup, Reset, Defaults]
- RCN Router [Login, Setup, Reset, Defaults]
Resetting your router will wipe out all the previously made configurations on your Western Digital router. Follow the steps below to do so:
- Step – 1: Locate the reset button on your Western Digital router.
- Step – 2: Press and hold the reset button for over 30 seconds by using a paper clip or a pin.
- Step – 3: While holding the reset button unplug your router from the power supply and again wait for 30 seconds.
- Step – 4: While still holding the reset button, turn on your router again and wait until it reboots.
After your router is rebooted, then it means that the reset process is successfully completed.
WD Router Port Forwarding
If you wish to forward ports for your device on your WD router, below is a guide that will help you with all the necessary steps to do so.
- Give a static IP address to your computer or any other device you want to forward ports to.
- Type the default gateway address of the WD router 192.168.1.1 in the browser to access its login page.
- Upon reaching on the login page, enter the default login credentials of the WD router in the given fields. The default WD router login details are;
Default Username: admin
Default Password: password
- After logging in the WD router’s settings panel, locate the Advanced Settings option.
- Now click on the Additional Features option.
- Now click on the Port Forwarding option.
- Check the Enabled box.
- In the Name box field, type a name for your service.
- In the IP Address box, type the IP address of your device you are forwarding ports to.
- For single port forwarding, type the same port number in Internal and External Port Range boxes.
- Choose the protocol from the Protocol box.
- Click the Save button to save the settings.
If you are facing any issues with your Western Digital router then do let me know in the comments section.
FAQ’s
Q1. How do I log in to my WD Router?
To log in to your WD Router, you will need to enter the router’s IP address into your web browser and then enter your username and password.
Q2. What is the default username and password for the WD Router?
The default username and password for the WD Router are typically “admin” and “password”, respectively. However, it is recommended that you change the default login information for security purposes.
Q3. How do I set up my WD Router?
To set up your WD Router, connect it to your modem using an Ethernet cable, and then follow the setup wizard that appears in your web browser.
Q4. How do I reset my WD Router?
To reset your WD Router, locate the reset button on the back of the router and press and hold it for at least 10 seconds.
Q5. What happens when I restore my WD Router to its default settings?
Restoring your WD Router to its default settings will erase all of your customized settings and return the router to its original configuration.