
Tenda router is well-known because of its networking speed and customizable settings. If you buy a Tenda router then you can get full access to the settings of your router and afterward you can customize them easily.
To customize your router, you need to get access to the admin panel of your Tenda router. The admin panel of the Tenda router is the web interface corresponding to your router, where all the necessary settings and information (regarding your device) are stored. In order to make changes to your router, you must log in to the control panel of your router.
Logging in to a Tenda router is an easy process but sometimes it may prove difficult for you. To make the process easy and error-free we have compiled a proper step by step guide regarding Tenda Router which mainly covers the router login, setup, reset and other processes.
How to login to a Tenda router?
Requirements:
- A Tenda Router
- Access to your router’s network
- Website Browser
Procedure:
Before starting the login process, it is recommended to note down the below-mentioned information somewhere because in the login process you will need it:
Default IP address: 192.168.0.1
Default Username: admin
Default Password: admin

Now, follow the steps mentioned below to get access to the settings dashboard of your Tenda router:
- Step – 1: Connect your device to your Tenda router by using a wireless or a wired connection (through Ethernet cable).
- Step – 2: Open your web browser and type the default IP address (192.168.0.1) of your Tenda router in the address bar. Hit the enter key.
- Step – 3: You will be redirected to the login interface of your Tenda router where you will be asked to enter the default username(admin) and password (admin) for your Tenda router.
- Step – 4: Now click on the sign-in button and within a few seconds you will get access to the settings dashboard of your Tenda router.
Tenda Router Default Username & Password: How to Change?
In this section, you will learn how to change the default admin password for your Tenda router.
Changing the default login details of your router is an effective step to make it more secure and protected. And, if you do not change the default login details then there are chances that your router might get attacked by some outsiders. People can get access to your router’s settings by using the default username and password only. And this information can be found easily on the internet.
Follow the steps below to change the default login credentials for your Tenda router.
- Step – 1: First of all login to the settings dashboard of your Tenda router.
- Step – 2: Now in the settings page click on advanced.
- Step – 3: In the advanced menu click on the Tools button
- Step – 4: Select the Change Password option located on the left side of your screen.
- Step – 5: Now, enter the new details for your Tenda router in the required fields.
- Step – 6: Click on the save button to save the changes you have just made.
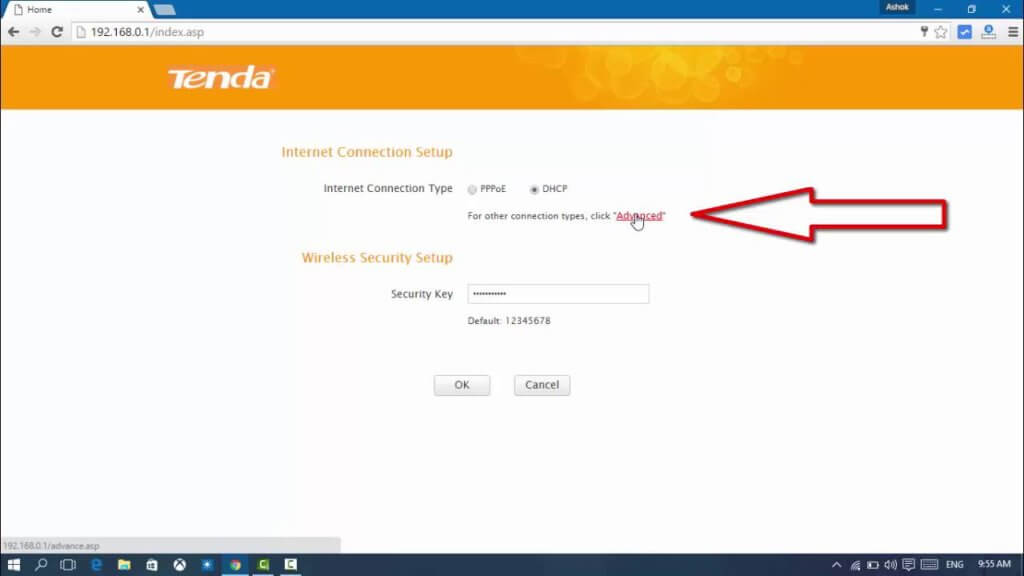
How to Set up a Tenda Router?

Are you facing problems while setting up your Tenda router for the first time? If yes then this guide is probably going to help you out. To make the setup process clear and error-free, follow the step by step guide mentioned below:
- Step – 1: First of all connect your modem with your Tenda router by using an Ethernet cable.
- Step – 2: After that connect your device with your router again by using a wired connection (with the help of ethernet cable).
- Step – 3: Now, check the LED lights of your router and check if the WLAN lights are on or if they are blinking or not.
- Step – 4: After that open your web browser and in the address bar type the default IP address of your router.
- Step – 5: Enter the required information on the login page and after a few seconds you will be redirected to your Tenda router settings dashboard.
- Step – 6: On the homepage, you will see the Setup Wizard. Click on the Next button.
- Step – 7: Fill in the necessary information and after that click on the Apply button.
- Step – 8: On the left side, you will see a connection status option click on it and after that check the connection status of your router. If the connection status shows connecting then please refresh the page and then again check the connection status.
- Step – 9: If it shows connected then now you can connect to your router wirelessly by configuring the settings of your router.
How to Reset a Tenda Router?
In case if you have forgotten the login details of your router or if you are facing any other sort of problem with your router which is not coming to an end then the best way to fix all these is to perform a factory reset on your Tenda router. This section will outline the process of resetting a Tenda router to factory defaults. Follow the steps mentioned below:
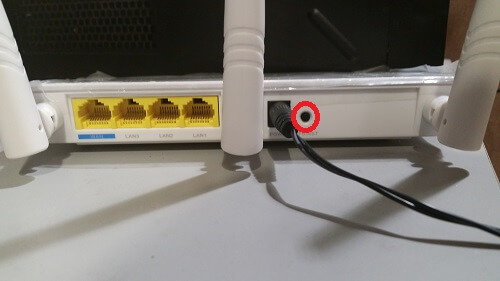
- Step – 1: Search for the Reset/WPS button on the rear side of your Tenda router
- Step – 2: Press and hold the Reset button for 7 seconds. You will see that the SYS light of your Tenda router stops blinking.
- Step – 3: Release the reset button in order to complete the process.
If you are facing any technical issue then contact the router support immediately.
Tenda Router Port Forwarding
Here is a guide on how to forward ports on your Tenda router;
- Assign a static IP to your device.
- Type 192.168.1.1 in the browser’s address bar, which is the default gateway to access the Tenda router’s web interface and press Enter.
- Type Tenda router’s default username (admin) and default password (admin) and press Enter.
- Click on the Advanced option.
- Click on the Advanced setup link.
- Click on the NAT link.
- Click on the Virtual Servers option.
- Click on the Add icon.
- Select the Custom Service radio button.
- Create a name in the Customs Service field.
- Enter your device’s IP in the Server IP Address.
- Enter the same port number in External and Internal Port Range boxes.
- Pick up a protocol type.
- Click Apply / Save.
Also Check:
- Clean Router [Login, Setup, IP, Defaults]
- Buffalo Router [Login, Reset, Setup, Defaults]
- Google Fiber Router [Login, Setup, Reset, Defaults]
- Apple Router [Login, Setup, Reset, Defaults]
FAQ’s:
Q1. How can I reset my Tenda router to factory settings?
A1. You can reset your Tenda router to factory settings by pressing and holding the reset button on the back of the router for at least 5 seconds. After releasing the button, the router will reboot and return to its default settings.
Q2. How can I change the wireless network name and password on my Tenda router?
A2. You can change the wireless network name and password on your Tenda router by logging into the router’s web interface and accessing the wireless settings. From there, you can modify the network name and password to your desired values.
Q3. How can I update the firmware on my Tenda router?
A3. You can update the firmware on your Tenda router by logging into the router’s web interface and navigating to the firmware update section. From there, you can download and install the latest firmware update provided by Tenda.
Q4. How can I set up parental controls on my Tenda router?
A4. You can set up parental controls on your Tenda router by logging into the router’s web interface and accessing the parental control settings. From there, you can configure rules to restrict access to certain websites or services based on the time of day or user.
Q5. How can I troubleshoot connectivity issues with my Tenda router?
A5. You can troubleshoot connectivity issues with your Tenda router by checking the physical connections to ensure they are properly plugged in, rebooting the router and modem, and resetting the router to its default settings if necessary. You can also contact Tenda support for further assistance.