
The Nighthawk Router is a high-performance router designed for households and businesses that demand reliable and fast internet connectivity. This router provides users with a plethora of features, including advanced parental controls, Quality of Service (QoS) settings, and the ability to prioritize specific devices or applications for smoother streaming and browsing. Additionally, the Nighthawk Router offers an intuitive web interface that makes it easy to set up and configure the router to your liking.
To access the Nighthawk Router’s settings, users must log in using the default login credentials. The default username is “admin,” and the default password is “password.” Once logged in, users can begin to configure the router’s settings and customize their network to their preferences. In this article, we will provide a guide on how to set up the Nighthawk Router, including steps on how to change the default login credentials and secure your network. Additionally, we will outline some of the router’s key features and how they can benefit your network.
How to login to a Nighthawk router?
Follow the steps below in order to login to a Nighthawk router:
- Step – 1: Connect your device to your router’s network. You can use an ethernet cable or a wireless WiFi connection to connect to your Nighthawk router.
- Step – 2: Start your device and open your web browser. Left-click on the address bar and type the https://www.routerlogin.net
- Step – 3: After opening the above page you will be prompted to a login screen where you can log in to your settings dashboard for Nighthawk router.
- Step – 4: Here, you need to enter your default username and password for the Nighthawk router. If you don’t know about your default login credentials then you can use the following:
Username: admin
Password: password
This login information is case sensitive, make sure to type it correctly.
If this login information didn’t work for you then you can search for your router’s username and password on your router’s modem.
How to setup a Nighthawk router?
Follow the steps below to set up your Nighthawk router:
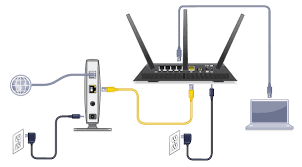
- Step – 1: Remove the cap from each of the antenna and then screw the antennas into the posts on the backside of the router.
- Step – 2: Unplug your modem from the power source in order to turn it off.
- If the modem has a battery backup, remove the battery from the device.
- Step – 3: Connect your ethernet cable to the yellow port on the back of the router.
- Step – 4: Connect the other end of the ethernet cable to the modem.
- Step – 5: Plug the modem into power to turn it back on.
- Step – 6: Press the power button on the router to turn it on.
- Step – 7: Now, wait until the router’s power light.
- Step – 8: On an iPad or other devices, connect to the router’s wireless network.
You can search for the network name (SSID) and password (network key) at the bottom of the nighthawk router.
After that, if you want to login to your nighthawk router then you can follow the steps which are mentioned above.
Nighthawk Router Port Forwarding
Forwarding ports on your Nighthawk router is accessible. Follow the below guide to do it in a simple way.
- Assign a static IP to your device.
- Type the default gateway of Nighthawk router 172.16.0.1 in the browser and hit Enter.
- Enter the default username of your Nighthawk router username (admin) and password (password) and click on login.
- Click on the Advanced option.
- Click on the Advanced Setup option.
- Click on the Port Forwarding option.
- Check the radio button of Port Forwarding.
- Click on the Add Custom Service option.
- Enter the name in the Service Name box.
- Pick the protocol type from the Protocol dropdown list.
- For single port forward, type the same port number in both External Starting and External Ending Port boxes.
- Check the box of Use the same port range for internal port option.
- In the Internal IP Address box, type the IP address of your device.
- Click on Apply.
Also Check: best nighthawk router for gaming
How can I reset my Netgear Nighthawk router?
If you have somehow forgotten your nighthawk router’s network or administration password then resetting your router is the only option left behind for you. Follow the steps below to reset your wireless router.
- Step – 1: Turn on your router
- Step – 2: Locate the reset button on your router. (Mostly, it is located on the rear side of a router)
- Step – 3: Use a paper clip or a pen to hold the reset button. Press and hold the reset button for over 15 seconds until the LED light of the router starts blinking. The router will reset automatically and it will automatically restart.
Note: Resetting your router will remove all the settings and modifications that you have previously made to your router. If you made changes to your router’s username and password then after resetting it to factory defaults the login credentials will also be reset.
How to configure the settings for the Nighthawk router?

After initial setup of the router if you want to make changings in the default settings such as changing the default network name and password, creating a guest network or any other settings related to your nighthawk router then follow the steps below:
First of all login to your router’s default WiFi settings and after that click on the basic homepage to configure the following:
- Network name (SSID)
- WiFi router password (network key)
- Guest network set up.
Network Names and Passwords
- Step – 1: Go the basic homepage and then click the ‘Wireless option’
- Step – 2: Type a name for your router’s WiFi network and then select a security type after that choose a password for the router’s 2.4GHz network.
- Step – 3: Scroll down and repeat the above step for 5GHz network
- Step – 4: Tap on the apply button to save the changes.
- Step – 5: Reconnect to your WiFi network to check if the changes are saved or not.
Create a Guest Network
If you want to allow your customers to use your internet then I will recommend you to create a guest network. In this way, your customers can connect to your network without accessing your private network.
- Step – 1: Go to the homepage and click on the Guest Network option.
- Step – 2: Select the ‘Enable Guest Network’ option and type the name for the network.
- Step – 3: Choose a security type and then enter a password for your guest network. If you don’t want to add security then you can leave the option blank.
- Step – 4: Select the ‘Apply‘ button to save the changes.
Other Routers Login and Setup:
- Verizon Router [Login, Setup, IP]
- Cisco Router [Login, Default Password, IP, Reset]
- CenturyLink Router [Login, Setup, IP]
FAQ’s
Q1. What is the default IP address for the Nighthawk router?
A1. The default IP address for the Nighthawk router is 192.168.1.1 or 192.168.0.1.
Q2. How do I set up my Nighthawk router?
A2. To set up your Nighthawk router, connect it to your modem and power it on. Open a web browser and follow the prompts to set up the router using the Nighthawk app or the web-based setup wizard. You will need to create a Wi-Fi network name and password and customize other settings as needed.
Q3. How do I change the default login credentials for my Nighthawk router?
A3. To change the default login credentials for your Nighthawk router, log in to the router using the default username and password. Navigate to the settings menu and select “Change Password” or a similar option. Enter your new login credentials and save the changes.
Q4. How do I update the firmware on my Nighthawk router?
A4. To update the firmware on your Nighthawk router, log in to the router using your admin credentials. Navigate to the “Advanced” or “Administration” settings menu and select “Firmware Update.” Follow the prompts to check for and install any available updates.
Q5. How do I reset my Nighthawk router to its factory default settings?
A5. To reset your Nighthawk router to its factory default settings, locate the reset button on the back of the router. Use a paperclip or similar object to press and hold the button for at least 7 seconds. The router will reboot and return to its original settings, including the default login credentials.